2.29.2012

I am a Vitamix Affiliate!!

This is very exciting for me!! I am a FIRM believer in spreading the word about products so when I received the opportunity to be a Vitamix Affiliate I was beyond ecstatic! I received my Vitamix as a birthday gift....and let me tell you it was a long time coming! I have been hinting bugging the husband for one for the past 5 years or so. As a group effort an investment towards my future addiction was made, and I couldn't be happier!

During the first few in store demos that we watched I was impressed, but admittedly not THAT impressed. Until....the demonstrator made Tortilla Soup. Impressed level...8/9 out of 10, then he turned right around and made sorbet...in seconds. Impression level...12 out of 10! I was immediately hooked from that moment on. Yes the Vitamix can whip up smoothies in seconds, sorbet in less than a minute, and HOT soup start to finish in about 10 minutes. Yes, I said HOT! Everything that I make seems to impress me in a different way, and I have been using the Vitamix multiple times a day.

***06-007070 ***
GET FREE STANDARD SHIPPING ($25US/$35CN)
USE ABOVE CODE

Visit the Vitamix Webpage, take a look around and be amazed for yourself!

Or you can contact
Janet Gladish at Vitamix at 1-800-848-2649 Ext. 2316. She is very helpful and helped me during my purchase and answered any questions that I had, even after my purchase.

Fast Food that's fresh from the garden
A whole food diet is the key to a long and healthy life. New recommendations encourage consuming more fruits, vegetables and whole grains every day. This is easily accomplished by eating terrific-tasting, nutrient-rich whole food meals made in the Vitamix machine.

Imagine...

Steaming hot soups & sauces in 4 minutes

Juice whole foods in 60 seconds

Frozen treats in 30 seconds

Grind grains and knead dough in one 5 minute operation
Cooking soup from scratch that's hot, hearty and satisfying in just 4 minutes.


Making whole food juice that's full of fiber and flavor in under a minute.


Making frozen treats that are full of fruit and low in fat in only 30 seconds.


Grinding fresh whole grains into flour and kneading dough for healthy home made bread in one 5-minute operation.


Click an image to view a live demonstration

*Flash Player Required


Vitamix Super 5200

Start your 30-day no-risk
in-home trial today
and we'll
give you FREE Standard
Ground Shipping

Click here to get started!


2.14.2012

Nothin Like Apple Pie {Smoothies}

Ummm YUM!!!

I will take have to remember to take pictures of all the yummy stuff I'm making in my Vita-Mix...but I don't remember until my glass is half empty!!

Tonight was the Apple Pie Smoothie found on Vita-Mix Recipes. I was wanting something sweet, different, and used apples that I have in the fridge.

Apple Pie Smoothie
frozen banana 1
peeled apple 1/2
apple juice 8 oz.
cinnamon 1/2 teaspoon
nutmeg pinch

Blend. Great substitute for applesauce! Control the consistency by adding more or less chopped apple.

My banana wasn't frozen and I didn't have nutmeg, I added a couple ice cubes and blended away!! It was delicious, like a liquid cinnamon-y applesauce!

2.11.2012

Everyday I'm Vitamix-in'!!!

I fell in love with Vitamix 5 years ago and have been dropping not so subtle hints to the hub & my mom since then!! The hub knows the wonderfulness of Vitamix (he's in love with the Chicken Tortilla Soup & the green smoothie from the demo) and my mom loves all things kitchen and cooking gadgets but hasn't been graced by the presence of Vitamix..YET!

For my birthday the hub & my parents & a little from myself went in together & I FINALLY got one :) YAY!! Yes I know, I know...I'm spoiled. But in my defense...it's SOOOOO worth it and I've only had it 2 days!

I have made 2 concoctions so far and love both!!

Yesterday for breakfast I (sorta) made the Peanut Butter Banana Smoothie from the Vitamix site.

Peanut Butter - Banana Smoothie

ripe bananas, peeled, frozen 2
milk 16 oz
creamy peanut butter 2 oz
sugar 2 tablespoons
imitation banana extract 1 teaspoon

Yield: 2

Place all ingredients in a Vita-Mix® blender. Blend until smooth. Pour into tall glasses and serve immediately.

My bananas weren't frozen, and I didn't add the sugar or extract but it was AMAZING!! I poured it into a blender bottle and took it to work with me. I drank both servings and was full until dinner time!

The taste was great! Like a banana covered in peanut butter, and the consistency was about like a melted milkshake..not milky but not thick either.

I decided to make it when I brought the boy home from school and he chugged it right down & said it was tasty!

Tonight I came up with another concoction. I'm sure its been made before but it was also a hit!!

2 bananas
1 naval orange
4 pineapple slices (all I had was canned)
1/2 of the pineapple juice from the can of pineapple slices
apple juice
ice

Blended until smooth & its oh so goood!!! Very tropical and refreshing!

I cannot wait to make more stuff and pass my addiction on to other unsuspecting Vitamix lovers!

Do you have a Vitamix? If so what's your favorite concoction?

1.14.2012

Crayon Wreath {Teacher Gift}


For Christmas I wanted to make my sons teacher something to show appreciation for all she has done so far! He's in Kindergarten and before Christmas break knew how to write all letters in cursive, could count to 100, reading 2-5 letter blends & words and already starting addition..I'm impressed to say the least! I have seen a few crayon wreaths online and really liked them..but wanted something different!

Off to Michael's we go!

Here's what we used -
Unfinished wood frame (has a 5x7 opening) - $5.00
Crayons (2 boxes) @ $1.00 each - $2.00 total
Small unfinished wood rectangle "sign" - $0.50
Painted School themed wood cutouts @ $0.25 each - $1.25
Black Matte Finish Paint (on hand) - FREE
White Matte Finish Paint (on hand) - FREE
Glue sticks & Glue Gun (on hand) - FREE
Ribbon (on hand) - FREE
Project Total - $8.75

Ok let's get started! You obviously can put the crayons on however you wanted but this is how I did it! Put all like colors together. I had the boy help me sort them out. Browns, Blacks (which included grays, silver, etc), & White went off to the side as the "extra" colors. I was going to try complete OCD and do all like colors and sort them lightest to darkest but decided to skip that with the help of a 5 year old!


I had the boy hand me whichever crayons he wanted in each group (and tried to not have the same color together). We worked in rainbow order and started with the reds and worked our way around. I found that trying to put glue on the frame first and sticking the crayon on next worked best. Gluing onto the crayon then to the frame made the crayon fall right off! I used a straight edge to line the crayons to the opening of the frame and started at the complete outside edge. I made sure the crayons were even with the floor on the sides of the frame. I worked around the frame clockwise and just repeated until I got back to the starting point.


For some reason the crayons didn't fit on the left side of the frame evenly like they did on the left side! I put one black crayon and two white (the two end crayons), rubbed the second black crayon on the glue gun a bit to melt it some and glued it and wedged into place between the first black and first white crayon. It sticks out some but not a biggie!


Next I put the ribbon on the back. Just made it even on both sides and used the cutout to make the length even. Lots and Lots of hot glue! The "wreath" wasn't heavy just wanted to be safe!

Painted the glass from the frame with a White letter M for his teachers name, let dry and painted over it in the matte black to look like a chalkboard.

The black "Welcome" sign I also painted like a chalkboard. Black with white letters and glued the school themed cutouts around the "chalkboard" and glued on to the wreath!


My biggest worry was breaking it before it got to the school! I was happy to see that after Christmas break it was hanging up in the classroom!

Pin It

12.15.2011

Stress Free {Clean} Holidays

This time of year can be super stressful, Thanksgiving, Christmas, kids out of school, New Years, traveling, guests...you name it, it happens..all in a just a little less than a month & a half! How do you keep the house tidy and clean {and your sanity} when everything else is going crazy?

First I like to plan ahead..traveling, cooking for a group, mailing things out, decorating; whatever it is I try to plan what needs to be done and when! For example, this Thanksgiving we hosted dinner at our house. We had a total of 8 adults, 4 kids & a new born over! One family even drove over 350 miles to come for the weekend! I made a list of everything I was making, what needed to go in when, at what temp & how long. In between prepping I would clean out bowls, wipe down counters & the stove, clean up drips, spills & splatters as I went. The kids all had to stay downstairs & play. And they actually did! I went to the dollar store a couple weeks before and bought plenty of plates, napkins, cups, forks & metal trays & casserole dishes to have enough (and a couple extras) for everything I was making. The day went pretty smooth...even when it was time to get everything out of the oven & ready to eat! Clean up was pretty easy...aluminum foil on the trays and into the fridge! The guys were all really good about taking the trash out thru the day so we didn't have overflowing trash!

Having guests? Clean a room each day! Focus on one room at a time and move to the next the next day. Doing one at a time makes you feel like you have less to do and is a lot less overwhelming than thinking today I have to clean the bathrooms, kitchen, living rooms, guest room, kids rooms, organize the closet, straighten the garage, do laundry, decorate the tree, hang lights. That makes me anxious just looking at the list! Break it up!!! Give yourself a break and you won't have the temptation to just give up or put it off longer (then you'll have more to do in less time)!

Same with shopping! Don't try to shop, wrap & mail all in one day (or weekend even)! We get all of our "mailed" gifts done and ready to go. I take them to the post office during the week when most people are at work (benefit of getting off at 3!). Lets me avoid weekend and lunch or after work waits at the post office..which is always a good thing! If I have boxes to mail...print and pay online and have the mailman pick them up with the rest of the mail..trip to the post office saved!!

Just try to relax and take things slowly. Start ahead of time and get big things out of the way first and save the little stuff til the end. And if all else fails..there is always the option of a nice warm blanket, the tv and a big glass of your favorite beverage of choice ;)


Merry Christmas & Happy Holidays!!

"I am sharing my holiday home decor and cleaning tips for the chance to win prizes from The SITS Girls and Great Cleaners."

12.12.2011

I'm Dreaming of A {DIY} Black, Silver & White Christmas

This year I've been wanting to change our Christmas theme. Our first (actually 2nd) married Christmas I bought Red, White (Silver) & Blue ornaments & a big yellow ribbon to go on top to symbolize deployment...that was in 2005! Since then we have had 2 Christmas' that we didn't decorate because we weren't home..other than that we have had a combo of the colors since then. BORING!! Growing up my mom would change the themes pretty much every year! We used the same ornaments just different main colors...red, gold, silver, white, I think I remember purple and blue also at some point! I told the hub that I wanted to change things this year & he said 'don't buy new ornaments.' SOOOOOOOOOO I didn't! I made "new" ones..with the help of my virtual bff Pinterest!

Here's what I used to accomplish my DIY Christmas Makeover-

Ornaments - $12
50 Glass Ball Ornaments - FREE! ($2...6 years ago)
Fine Glitter (found it in the Scrapbooking section) Black, Silver & White - $2 each (about $4 each but used Michael's Coupons)
Bleach - $3 (maybe used half the bottle)
Floor Finish Polish - $3 (used maybe 1/4 cup)

Tree Topper Ribbon - $2.50 (30 Yards from Michael's 50% off sale)
Black Pipe Cleaner - FREE! had them left over from a Halloween craft

Tree Skirt - $10.50
Black Fabric - $7 from the thrift store
Gray Fabric - $3.50 from the thrift store (the back side of a gray microfiber bed skirt)

Coffee Filter Wreath - $2.50
Wreath Form - FREE! (Used the frame of a canvas that I messed up painting, took the canvas off!)
Coffee Filters - $1.50 (dollar store 160 count..ended up using about 180)
Ribbon & Bow - $1
Glue gun & a bunch of sticks!!!

DIY Christmas Makeover Total - $27.50..give or take!

First...the Ornaments -

I found pictures of 'Glitter Ornaments' all over the Internet, not to mention videos on YouTube! They looked super glittery, sparkly, and girly! The problem is with the girly! Hub wouldn't go for that very much so I had to think of a way to make it work! I didn't want something "usual" I found a Black & White theme but it wasn't enough! So I added silver to the mix & started looking for Black, White & Silver Christmas trees online and really only found one tree! SCORE!!! Now I had to figure out how to do the glitter ornaments...with my old balls! Thank goodness for Google...a bucket, bleach & balls! Soak the balls in the bucket of bleach overnight (or until they are clear). If you have difficulty getting the paint off add some uncooked rice and shake around in the bleach. It knocks the old paint off pretty easily!

I started with a box of blue & a box of silver glass ball ornaments. Took the caps & hooks off and submerged a few of them into a bucket of bleach. Almost instantly the paint (inside and out) started coming off! Let them soak awhile & cleaned them off to find gray spots :( Fast forward to Thanksgiving weekend & add in black, silver & white fine glitter, along with a HUGE bottle of bleach and floor finish. The stuff online says to use Future Polish...we used some in a white & green bottle and it worked just fine! Repeat the bleach process until they're all clear! Squirt some of the floor polish into the ball, swirl around so the entire ball is coated on the inside, pour out the extra into a cup (or the bottle), shake to get excess out. Pour in glitter and repeat the swirling process. Let dry and you have a new ornament!


Next..the Tree Topper -

A friend found this tutorial for a tree topper bow. I made 10 loops per side..so 20 loops total. I wanted tails for my tree and wanted more than 2! So I unrolled the rest of the ribbon and cut it in half, then folded the two strands in half and wrapped with a pipe cleaner. Attached that pipe cleaner onto the bows pipe cleaner and attached it to the tree! If you want the ^ at the bottom of the tails fold in half and cut from the middle (folded part) diagonally to the outside. I don't know how or why I didn't take more pictures than when it was already on the tree..but here it is!


Now the Wreath!

Get comfortable for this one..you'll be there awhile! There are lots of blogs that have the Coffee Filter Wreaths is used this one because it had a rectangle wreath which is what I wanted! Again I had to be different!! Pretty much you fold the coffee filter in half, and in half again. Glue the bottom, stick to the wreath & repeat...x180! I just did the back of the "wreath" and flipped over and started on the outside then did the inside of the rectangle and worked my way around and repeated the process until it was covered. Fluffed and pulled and filled in where needed. I added the hanger ribbon on the back...with hot glue. and made a bow with 3 loops on each side and 4 short tails (I really don't know why 2 doesn't do it for me but this is obviously a trend)!! Tied the bow with tails off with a pipe cleaner and hot glued onto the filters. I had to glue in multiple spots to make sure it wasn't sagging! Hang it on the door & BAM!! new wreath..just hope you don't have to chase it through the snow (in socks) during a wind storm like I did!!


& Last, but not least...(but the most time consuming)....The Tree Skirt!
Again..let's be different & must match theme! My round red & white "Santa" skirt just wouldn't cut it! I found this beauty from Crate & Barrel but for $100 my thought was *someone* must be drunk...or I obviously wasn't drunk enough to spend that much on a tree skirt! It's out for about a month out of the year...are you kidding me!!?? Off to the thrift store I went and came out with plain black fabric and a gray microfiber bed skirt. It wasn't until I got home that I realized the back of the bed skirt was even more amazing than the front!! It is silky and semi shiny! The hard part for the mathematically challenged (that would be me) is cutting out an octagon!! I know its 8 triangles..but the tricky part is how big is each one?!?! I found a calculator online (and of course can't find it now) that is meant for building gazebos and octagonal decks and got my measurements. Cut out the pieces. I did black triangles and cut the middle out of all for the gray piece. Then cut the gray fabric out. I sewed the outside ring first, then the inside ring, then the gray. Once I was done with each section I laid it out on the floor to make sure it fit and sewed together from the outside in, leaving one side open to fit the tree. I was too lazy to stitch the outside, the open side & the ring at the top so I trimmed them up and put fray block around the whole thing!


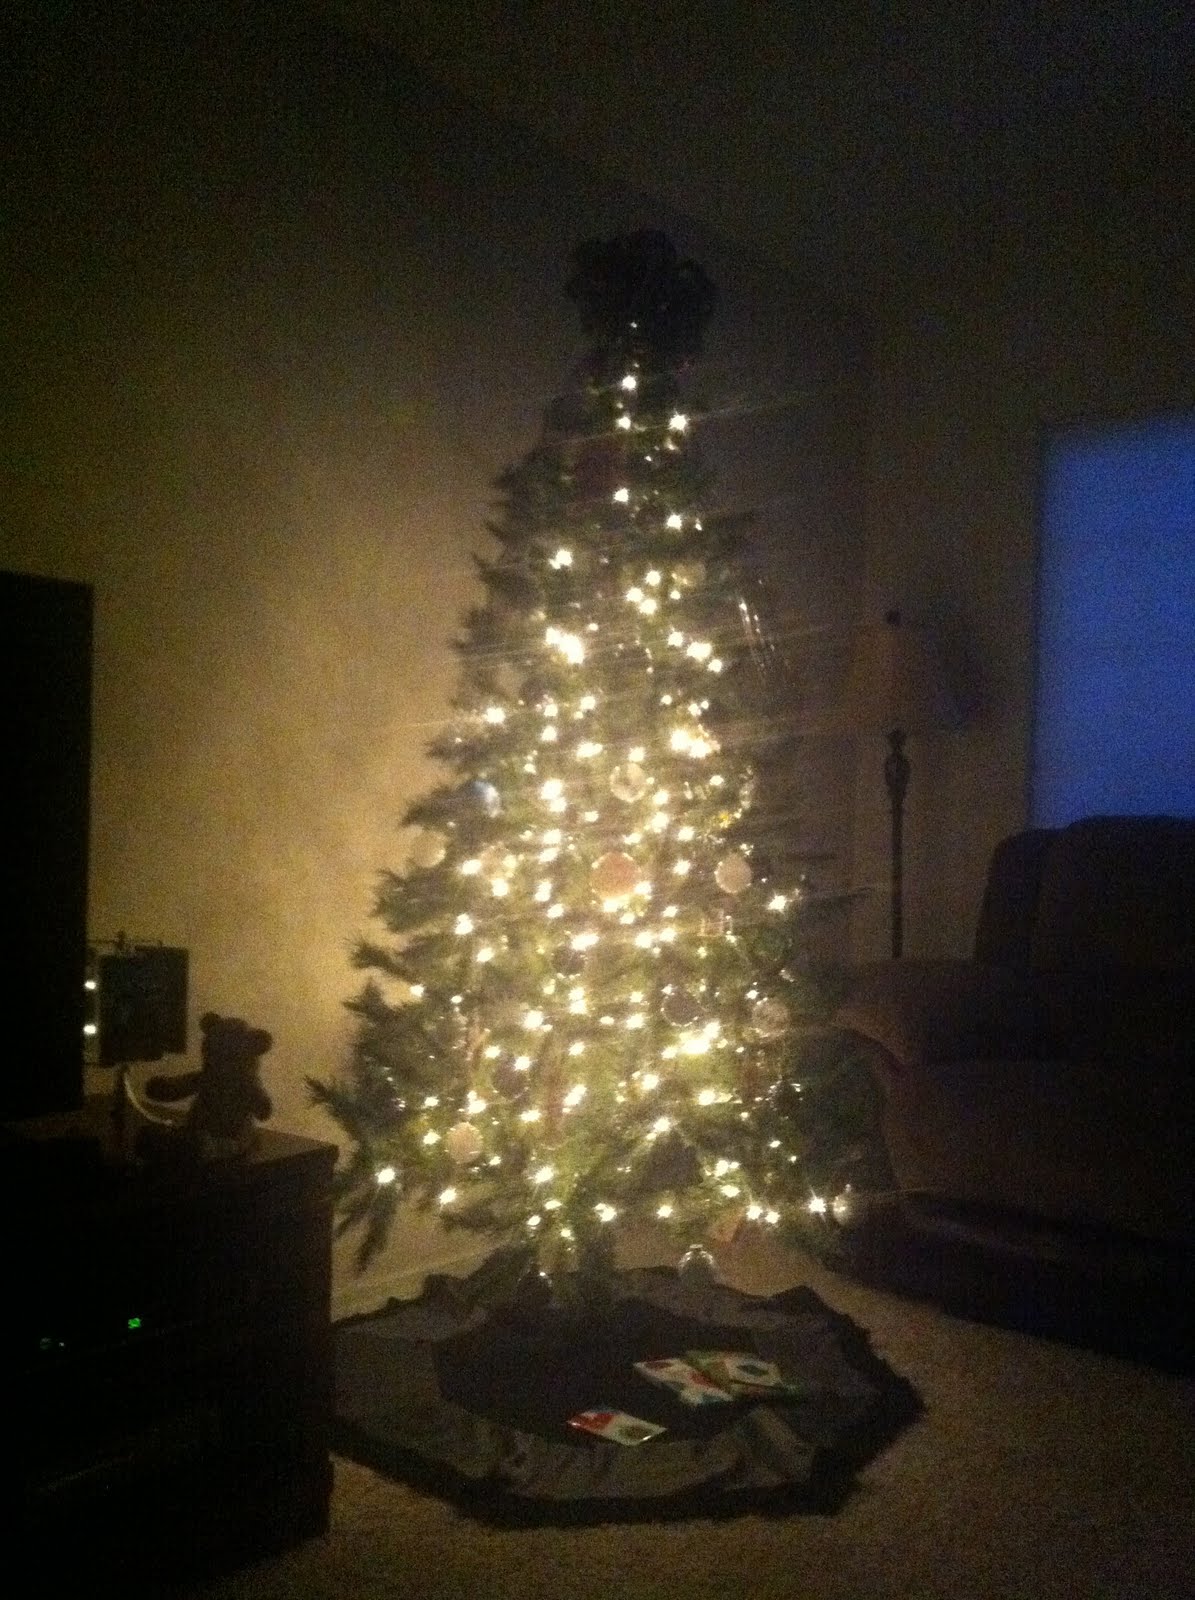
And here it is all lit & sparkly in the dark (at 4 in the afternoon)! I am absolutely in LOVE with the tree and am anxious to see what the hub thinks when he sees it!


& I'm not really sure why Blogger insists on mixing up my pictures but I'll try to get them in order soon!!

Pin It

11.16.2011

ADDICTION

Ok I have to say that EVERYONE has an addiction of some sort!
Mine is Pinterest! It's really not a secret!!! If you haven't been there...go! NOW!!! Wanna do "something" but don't know what? Go, look around for a couple seconds and ideas will be pouring out!

If you have Pinterest feel free to follow my boards at melissay27

10.23.2011

Fall Wreath

My new "thing" is wreaths! My Grandma used to change hers out according to the season, I always thought they were old lady-ish but now I think they are a great, cheap and easy way to decorate and show off what is usually a pretty boring area!
I wanted something that I could put up in the fall and keep up until Thanksgiving. The plan was originally Halloween then take down til Thanksgiving but that wreath turned into a mess...literally! I had melted candy corn on my door step!

So here is what I came up with, and all under $10!


What you need....

A wreath form...I used a 14" straw form because it felt more fall to me! (and kept the plastic on it because I was wrapping it in bed & didn't want straw bits everywhere!!)
Yarn...I picked up 'Falling Leaves" by TLC Essentials at Joanns for a few bucks
Felt...I got the sheets at Joanns (I think they were the 9"x12" ones) they were all around $0.50..the fancier textured ones might have been closer to $1.
Scissors
Hot Glue
A comfortable place to sit
A good movie or plenty of DVR'ed shows

Basically you are just going to wrap your wreath in yarn. I made one loop around & tied on the back of the wreath so that the knot wouldn't be visible from the front. Just keep wrapping, and wrapping, and wrapping....and wrapping. Every once in awhile you may have to adjust the yarn so that there aren't any spots showing through (or leave it if you want a more "rustic" look with a straw wreath. I have read that some people use a dab of hot glue around their wreath to keep it in place, I didn't see where it would be necessary unless you were preparing to hang it during a hurricane!!

Once you have it all covered tie it off on the back. I tied mine to the starting knot.

Next its time for the flowers! Cut a circle shape out of your felt. I cut different sizes so I would have different sized flowers. Use a decent size circle...a glass, bowl, small plate or measuring cup work great! You could even freehand your circles...I'm just not that talented! Now you will cut the circle into a swirl, but leave room in the "middle" of the circle for a base. You will be hot gluing your flower to the base so it needs to be a pretty good size. To cut the swirl think the things you used to draw when you played MASH! I made some a little wavy as I was cutting and gave my flowers some "texture". You could even practice with paper first to see what the results would be! Once you have your swirl cut out you are going to roll it from the outside (point of the swirl) to the inside (base). You can make the roll pretty tight or kinda loose...as long as it all fits onto the base when you are done! Once you have your roll, put hot glue on the base (enough to hold all of your roll in place)..and say goodbye to your fingerprints!! Repeat until you have the amount of flowers that you want!! I cut leaves out of a green felt as well...just the basic leaf shape and glued them under and between the flowers.

Glue your flowers how you like them on your wreath. Glue the leaves if you want them...if not, hang on the door and you're DONE!!


10.17.2011

Starting Over!!

I deleted EVERYTHING on my Blog & have decided to start over completely!!

My plans for this Blog are now crafting...of all kinds & recipes & meal planning! And ALL budget friendly! I like to change decor frequently so keeping things budget friendly is a must! If I make something that is a little more pricey I try to think of ways that I can reuse it over again, or change it and make it into something else! I *hope* to try YouTube Tutorials of crafts!

I am constantly looking at other blogs for inspiration for my next project!

Please follow and leave your blog link so I can follow back :)